Authentication in Headless Shopify Using Better-Auth and Next.js
Authentication is a critical component of any e-commerce application. When building a headless Shopify storefront with Next.js, you need a robust authentication solution that integrates seamlessly with Shopify's customer API. In this article, we'll explore how to implement authentication using Better-Auth, a modern authentication library for Next.js applications.
Live Demo: https://headless-shopify-site.vercel.app/
What is Better-Auth?
Better-Auth is a flexible, type-safe authentication library for Next.js that provides a plugin-based architecture. It offers:
- 🔐 Type-safe authentication flows
- 🔌 Plugin-based extensibility
- 🍪 Secure cookie-based session management
- 📦 Built-in Next.js integration
- 🎯 Developer-friendly API
Why Better-Auth for Shopify?
When building a headless Shopify storefront, you need to integrate with Shopify's Customer API for authentication. Better-Auth's plugin system makes it perfect for this use case because:
- Custom Plugin Support: Create a custom Shopify authentication plugin that wraps Shopify's Customer API
- Next.js Integration: Built-in support for Next.js App Router and API routes
- Secure Cookie Management: Handles access token storage securely with HTTP-only cookies
- Type Safety: Full TypeScript support for authentication flows
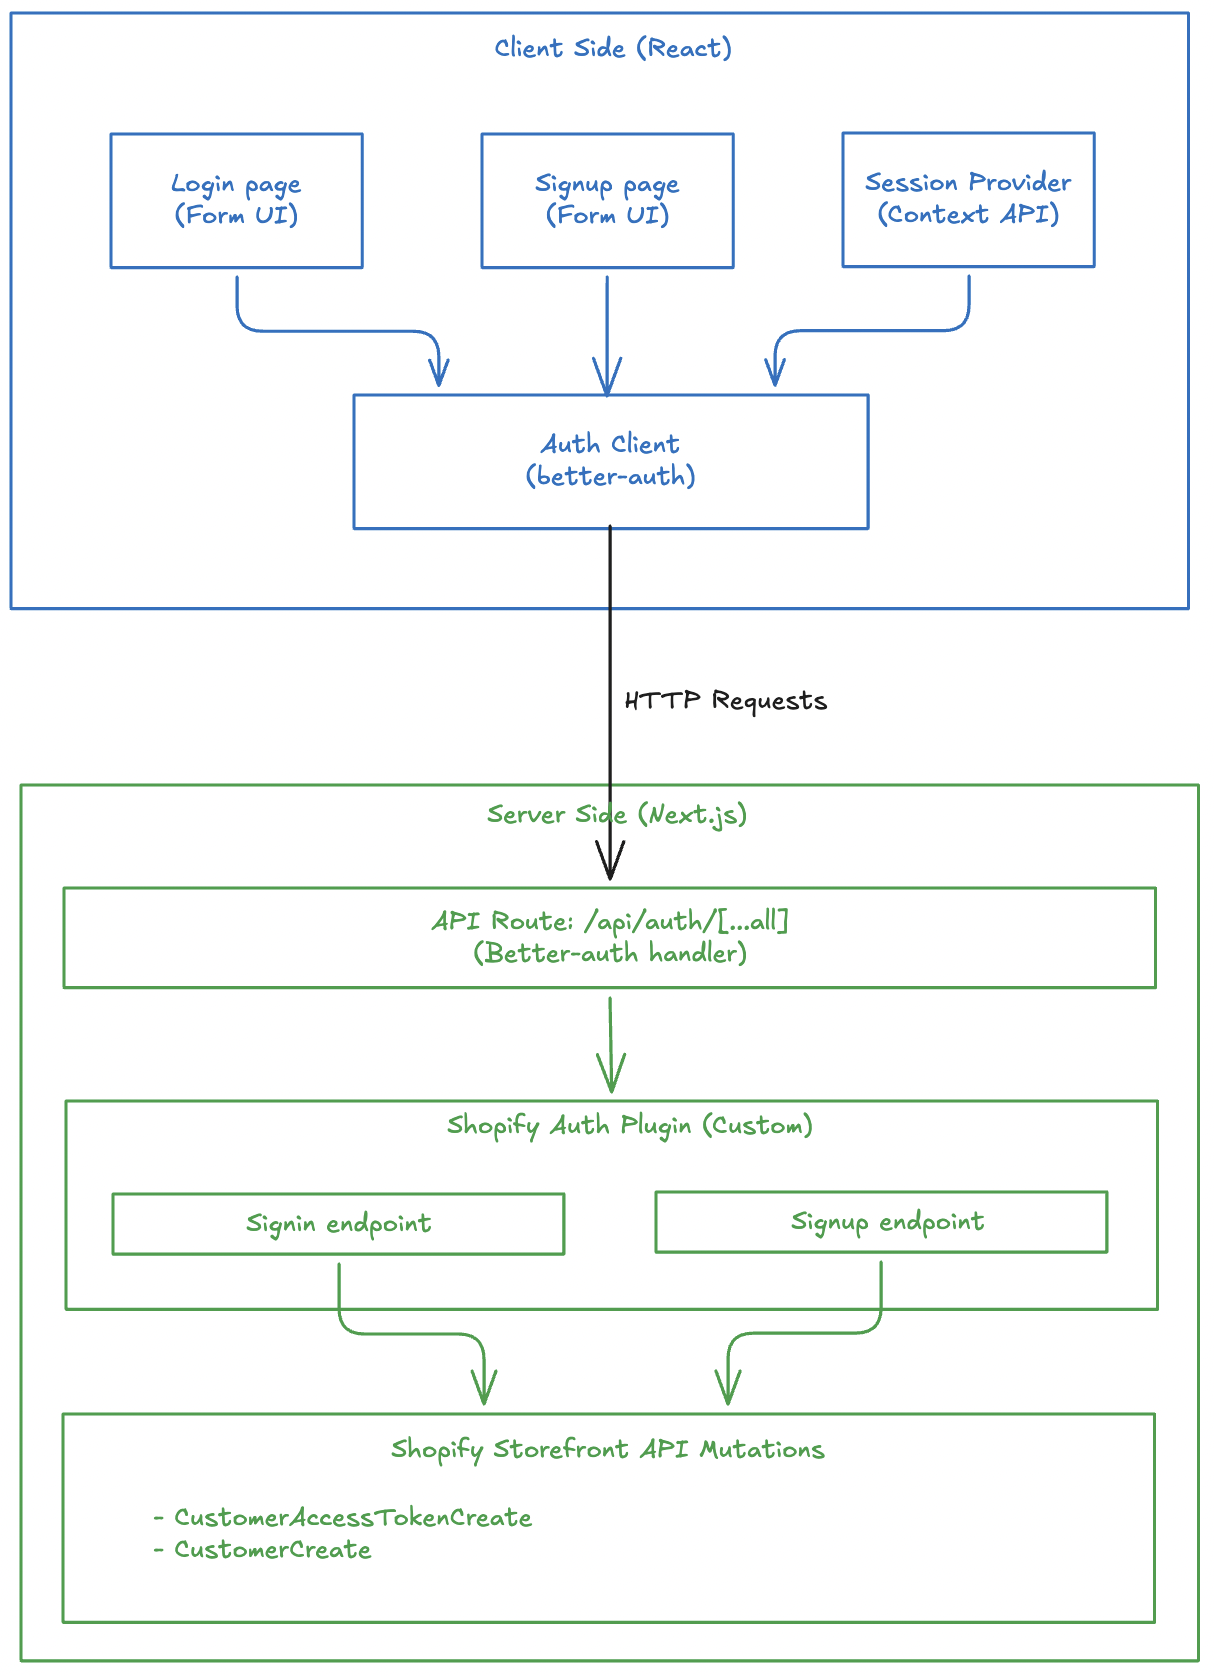
Architecture Overview
Our authentication implementation consists of several key components:
Prerequisites
Before implementing authentication with Better-Auth, ensure you have:
- Next.js Setup: A working Next.js application (App Router or Pages Router)
- Shopify Integration: Logic to execute Shopify customer mutations (
customerAccessTokenCreate,customerCreate, etc.) via Shopify's Storefront API
This article focuses specifically on integrating Better-Auth with Shopify and does not cover Next.js setup or Shopify API integration basics.
Step 1: Install Better-Auth
First, install the required dependencies:
pnpm add better-auth
# or
npm install better-auth
# or
yarn add better-auth
Step 2: Configure Environment Variables
Add the required environment variable for Better-Auth:
# .env
BETTER_AUTH_SECRET=your_secret_key_here
Generate a secure secret key using:
openssl rand -base64 32
Your project might have other environment variables like Shopify Graphql endpoint, storefront access token. I am not writing everything here to stick to the auth logic.
Step 3: Create the Shopify Auth Plugin (Server)
The Shopify auth plugin is the heart of our authentication system. It creates custom endpoints that integrate with Shopify's Customer API.
Define Input Types
First, define TypeScript types for sign-in and sign-up inputs:
// src/lib/shopify-auth-plugin.ts
export type ShopifySignInInput = {
  email: string;
  password: string;
};

export type ShopifySignUpInput = {
  email: string;
  password: string;
  firstName?: string;
  lastName?: string;
  acceptsMarketing?: boolean;
  autoSignIn?: boolean;
};
You might not need this if you are not using TypeScript.
Setup Validation Schemas
Use Zod to validate incoming requests:
import * as z from "zod";

const signInSchema = z.object({
  email: z.email().min(1),
  password: z.string().min(1),
});

const signUpSchema = z.object({
  email: z.email().min(1),
  password: z.string().min(1),
  firstName: z.string().min(1).optional(),
  lastName: z.string().min(1).optional(),
  acceptsMarketing: z.boolean().optional(),
  autoSignIn: z.boolean().optional(),
});
Zod is optional. You can skip this if you are not concerned about input validation. Not a mandatory thing for better-auth.
Create the Sign-In Endpoint
The sign-in endpoint calls Shopify's customerAccessTokenCreate mutation and stores the token in an HTTP-only cookie:
import { APIError, createAuthEndpoint } from "better-auth/api";

const SHOPIFY_CUSTOMER_TOKEN_COOKIE = "shopifyCustomerAccessToken";

export const shopifyAuthPlugin = () => {
  return {
    id: "shopify-auth",
    endpoints: {
      signIn: createAuthEndpoint(
        "/shopify-auth/sign-in",
        {
          method: "POST",
          body: signInSchema,
        },
        async (ctx) => {
          const { email, password } = ctx.body;

          // Call Shopify's customer access token create mutation
          const result = await customerAccessTokenCreate({ email, password });

          if (!result) {
            throw new APIError("BAD_REQUEST", {
              message: "Shopify sign-in failed.",
            });
          }

          // Extract token and errors from response
          const payload = result.customerAccessTokenCreate;
          const userErrors = payload?.customerUserErrors ?? [];
          const token = payload?.customerAccessToken?.accessToken;
          const expiresAt = payload?.customerAccessToken?.expiresAt;

          if (userErrors.length || !token) {
            throw new APIError("UNAUTHORIZED", {
              message: userErrors[0]?.message || "Invalid email or password.",
            });
          }

          // Store token in secure HTTP-only cookie
          ctx.setCookie(SHOPIFY_CUSTOMER_TOKEN_COOKIE, token, {
            httpOnly: true,
            secure: process.env.NODE_ENV === "production",
            sameSite: "lax",
            path: "/",
            expires: expiresAt ? new Date(expiresAt) : undefined,
          });

          return ctx.json({ ok: true });
        },
      ),
      // ... signUp endpoint
    },
  };
};
The sign-in flow:
- Validates email and password using Zod
- Calls Shopify's
customerAccessTokenCreatemutation - Checks for errors in the response
- Stores the access token in an HTTP-only cookie
- Returns success response
I have not given the details of customerAccessTokenCreate() function to keep this article stick to auth related logic. You can visit the Github repo of headless-shopify to get that function and see how it works.
Create the Sign-Up Endpoint
This section should go inside the endpoints object, just like signIn.
The sign-up endpoint creates a new customer in Shopify and optionally signs them in:
signUp: createAuthEndpoint(
  "/shopify-auth/sign-up",
  {
    method: "POST",
    body: signUpSchema,
  },
  async (ctx) => {
    const { email, password, firstName, lastName, acceptsMarketing, autoSignIn } = ctx.body;

    // Create customer in Shopify
    const result = await customerCreate({
      email,
      password,
      firstName,
      lastName,
      acceptsMarketing,
    });

    const payload = result.customerCreate;
    const userErrors = payload?.customerUserErrors ?? [];
    const customer = payload?.customer;

    if (userErrors.length || !customer) {
      throw new APIError("BAD_REQUEST", {
        message: userErrors[0]?.message || "Unable to create customer.",
      });
    }

    // Optionally sign in the user immediately after signup
    if (autoSignIn) {
      const signInResult = await customerAccessTokenCreate({ email, password });
      const token = signInResult?.customerAccessTokenCreate?.customerAccessToken?.accessToken;

      if (token) {
        ctx.setCookie(SHOPIFY_CUSTOMER_TOKEN_COOKIE, token, {
          httpOnly: true,
          secure: process.env.NODE_ENV === "production",
          sameSite: "lax",
          path: "/",
        });
      }
    }

    return ctx.json({ ok: true, customer });
  },
),
The sign-up flow:
- Validates all input fields using Zod
- Calls Shopify's
customerCreatemutation - Handles any errors from Shopify
- If
autoSignInis true, immediately signs in the user - Returns success with customer data
Step 4: Configure Better-Auth Server
Create the Better-Auth server instance:
// src/lib/auth.ts
import { betterAuth } from "better-auth";
import { nextCookies } from "better-auth/next-js";
import { shopifyAuthPlugin } from "@/lib/shopify-auth-plugin";

export const auth = betterAuth({
  plugins: [nextCookies(), shopifyAuthPlugin()],
});
Step 5: Create API Route Handler
Create a catch-all API route for Better-Auth:
// src/app/api/auth/[...all]/route.ts
import { auth } from "@/lib/auth";
import { toNextJsHandler } from "better-auth/next-js";

export const { GET, POST } = toNextJsHandler(auth);
This creates the following endpoints:
POST /api/auth/shopify-auth/sign-in- Sign inPOST /api/auth/shopify-auth/sign-up- Sign up
Step 6: Create Client-Side Auth Plugin
A better-auth client-side plugin consumes the APIs created by server-side plugin.
Create the client-side plugin:
// src/lib/shopify-auth-client.ts
import type { BetterAuthClientPlugin } from "better-auth/client";
import type { BetterFetchOption } from "@better-fetch/fetch";
import type {
  shopifyAuthPlugin,
  ShopifySignInInput,
  ShopifySignUpInput,
} from "@/lib/shopify-auth-plugin";

export const shopifyAuthClientPlugin = () => {
  return {
    id: "shopify-auth",
    $InferServerPlugin: {} as ReturnType<typeof shopifyAuthPlugin>,
    getActions: ($fetch) => {
      return {
        shopifySignIn: async (
          data: ShopifySignInInput,
          fetchOptions?: BetterFetchOption,
        ) => {
          return $fetch("/shopify-auth/sign-in", {
            method: "POST",
            body: data,
            ...fetchOptions,
          });
        },
        shopifySignUp: async (
          data: ShopifySignUpInput,
          fetchOptions?: BetterFetchOption,
        ) => {
          return $fetch("/shopify-auth/sign-up", {
            method: "POST",
            body: data,
            ...fetchOptions,
          });
        },
      };
    },
  } satisfies BetterAuthClientPlugin;
};
Step 7: Initialize Auth Client
Create the auth client instance:
// src/lib/auth-client.ts
import { createAuthClient } from "better-auth/react";
import { shopifyAuthClientPlugin } from "@/lib/shopify-auth-client";

export const authClient = createAuthClient({
  plugins: [shopifyAuthClientPlugin()],
});
Step 8: Create Login Page
Now let's build the login UI that uses our auth client.
Setup Component State
// src/app/account/login/page.tsx
"use client";

import React, { useState } from "react";
import { authClient } from "@/lib/auth-client";
import { useRouter } from "next/navigation";

export default function LoginPage() {
  const [loading, setLoading] = useState(false);
  const [error, setError] = useState<string | null>(null);
  const router = useRouter();
  // ... form handler
}
Handle Form Submission
The form handler calls the shopifySignIn method from our auth client:
async function onSubmit(e: React.FormEvent<HTMLFormElement>) {
  e.preventDefault();
  setError(null);
  setLoading(true);

  const form = e.currentTarget;
  const email = (form.elements.namedItem("email") as HTMLInputElement).value;
  const password = (form.elements.namedItem("password") as HTMLInputElement)
    .value;

  try {
    const shopifyAuth = await authClient.shopifySignIn({
      email,
      password,
    });

    // Check for errors in the response
    const shopifyError = (shopifyAuth as { error?: { message?: string } })
      ?.error?.message;
    if (shopifyError) {
      setError(shopifyError || "Invalid email or password.");
      return;
    }

    // Verify successful sign-in
    const shopifyData = (shopifyAuth as { data?: { ok?: boolean } })?.data;
    if (!shopifyData?.ok) {
      setError("Invalid email or password.");
      return;
    }

    // Redirect to account page on success
    router.push("/account");
  } catch (err) {
    setError("An error occurred. Please try again.");
  } finally {
    setLoading(false);
  }
}
Render the Form
Create a simple, accessible form:
return (
  <div className="max-w-md mx-auto mt-8 p-6">
    <h1 className="text-2xl font-bold mb-6">Sign In</h1>

    <form onSubmit={onSubmit} className="space-y-4">
      <div>
        <label htmlFor="email" className="block text-sm font-medium mb-2">
          Email
        </label>
        <input
          id="email"
          name="email"
          type="email"
          required
          className="w-full px-3 py-2 border rounded-md"
        />
      </div>

      <div>
        <label htmlFor="password" className="block text-sm font-medium mb-2">
          Password
        </label>
        <input
          id="password"
          name="password"
          type="password"
          required
          className="w-full px-3 py-2 border rounded-md"
        />
      </div>

      {error && <div className="text-red-600 text-sm">{error}</div>}

      <button
        type="submit"
        disabled={loading}
        className="w-full bg-blue-600 text-white py-2 rounded-md"
      >
        {loading ? "Signing in..." : "Sign In"}
      </button>
    </form>
  </div>
);
Step 8b: Create Signup Page
Similarly, let's create the signup page that allows new users to create accounts.
Setup Component State
// src/app/account/register/page.tsx
"use client";

import React, { useState } from "react";
import { authClient } from "@/lib/auth-client";

export default function RegisterPage() {
  const [loading, setLoading] = useState(false);
  const [error, setError] = useState<string | null>(null);
  // ... form handler
}
Handle Form Submission
The form handler calls shopifySignUp with the new customer information:
async function onSubmit(e: React.FormEvent<HTMLFormElement>) {
  e.preventDefault();
  setError(null);
  setLoading(true);

  const form = e.currentTarget;
  const firstName = (form.elements.namedItem("firstName") as HTMLInputElement)
    .value;
  const lastName = (form.elements.namedItem("lastName") as HTMLInputElement)
    .value;
  const email = (form.elements.namedItem("email") as HTMLInputElement).value;
  const password = (form.elements.namedItem("password") as HTMLInputElement)
    .value;

  try {
    const shopifyAuth = await authClient.shopifySignUp({
      email,
      password,
      firstName,
      lastName,
      acceptsMarketing: false,
      autoSignIn: true, // Automatically sign in after signup
    });

    // Check for errors
    const shopifyError = (shopifyAuth as { error?: { message?: string } })
      ?.error?.message;
    if (shopifyError) {
      setError(shopifyError || "Unable to create account.");
      return;
    }

    // Verify success
    const shopifyData = (shopifyAuth as { data?: { ok?: boolean } })?.data;
    if (!shopifyData?.ok) {
      setError("Unable to create account.");
      return;
    }

    // Redirect to home page on success
    window.location.href = "/";
  } catch {
    setError("Unable to create account. Please try again.");
  } finally {
    setLoading(false);
  }
}
Note the autoSignIn: true option - this automatically signs in the user after successful registration, providing a seamless onboarding experience.
Render the Form
Create a registration form with fields for first name, last name, email, and password:
return (
  <div className="max-w-md mx-auto mt-8 p-6">
    <h1 className="text-2xl font-bold mb-6">Create Account</h1>

    <form onSubmit={onSubmit} className="space-y-4">
      <div>
        <label htmlFor="firstName" className="block text-sm font-medium mb-2">
          First Name
        </label>
        <input
          id="firstName"
          name="firstName"
          type="text"
          required
          className="w-full px-3 py-2 border rounded-md"
        />
      </div>

      <div>
        <label htmlFor="lastName" className="block text-sm font-medium mb-2">
          Last Name
        </label>
        <input
          id="lastName"
          name="lastName"
          type="text"
          required
          className="w-full px-3 py-2 border rounded-md"
        />
      </div>

      <div>
        <label htmlFor="email" className="block text-sm font-medium mb-2">
          Email
        </label>
        <input
          id="email"
          name="email"
          type="email"
          required
          className="w-full px-3 py-2 border rounded-md"
        />
      </div>

      <div>
        <label htmlFor="password" className="block text-sm font-medium mb-2">
          Password
        </label>
        <input
          id="password"
          name="password"
          type="password"
          required
          className="w-full px-3 py-2 border rounded-md"
        />
      </div>

      {error && <div className="text-red-600 text-sm">{error}</div>}

      <button
        type="submit"
        disabled={loading}
        className="w-full bg-blue-600 text-white py-2 rounded-md"
      >
        {loading ? "Creating Account..." : "Create Account"}
      </button>
    </form>
  </div>
);
Step 9: Create Session Provider
A session provider manages user authentication state across your application using React Context.
Define Context Types
// src/providers/session-provider.tsx
"use client";

import {
  createContext,
  useCallback,
  useContext,
  useEffect,
  useState,
} from "react";
import { getCurrentUser } from "@/lib/shopify/queries/customers/getCurrentUser";

type SessionUser = Awaited<ReturnType<typeof getCurrentUser>>;

type SessionContextValue = {
  user: SessionUser;
  loading: boolean;
  error: string | null;
  refresh: () => Promise<void>;
};
Create the Provider Component
const SessionContext = createContext<SessionContextValue | undefined>(
  undefined,
);

export function SessionProvider({ children }: { children: React.ReactNode }) {
  const [user, setUser] = useState<SessionUser>(null);
  const [loading, setLoading] = useState(true);
  const [error, setError] = useState<string | null>(null);

  const refresh = useCallback(async () => {
    try {
      setLoading(true);
      setError(null);
      const currentUser = await getCurrentUser();
      setUser(currentUser);
    } catch (err) {
      setError(err instanceof Error ? err.message : "Failed to load user");
      setUser(null);
    } finally {
      setLoading(false);
    }
  }, []);

  useEffect(() => {
    refresh();
  }, [refresh]);

  return (
    <SessionContext.Provider value={{ user, loading, error, refresh }}>
      {children}
    </SessionContext.Provider>
  );
}
The provider automatically fetches the current user on mount and provides a refresh method to reload user data.
Create a Custom Hook
useSession() provides access to session-related data and functionality throughout your application.
export function useSession() {
  const context = useContext(SessionContext);
  if (context === undefined) {
    throw new Error("useSession must be used within a SessionProvider");
  }
  return context;
}
Step 10: Use Session in Your App
Wrap Your App
Add the SessionProvider to your root layout:
// src/app/layout.tsx
import { SessionProvider } from "@/providers/session-provider";

export default function RootLayout({
  children,
}: {
  children: React.ReactNode;
}) {
  return (
    <html lang="en">
      <body>
        <SessionProvider>{children}</SessionProvider>
      </body>
    </html>
  );
}
Access User Data
Use the useSession hook in any component to access authentication state:
"use client";

import { useSession } from "@/providers/session-provider";

export function UserProfile() {
  const { user, loading, error } = useSession();

  if (loading) return <div>Loading...</div>;
  if (error) return <div>Error: {error}</div>;
  if (!user) return <div>Not logged in</div>;

  return (
    <div>
      <h2>Welcome, {user.firstName}!</h2>
      <p>Email: {user.email}</p>
    </div>
  );
}
The session hook provides:
user- Current user data or nullloading- Boolean indicating if user data is being fetchederror- Error message if fetching failedrefresh()- Function to manually reload user data
Key Security Features
1. HTTP-Only Cookies
The access token is stored in an HTTP-only cookie, making it inaccessible to JavaScript:
ctx.setCookie(SHOPIFY_CUSTOMER_TOKEN_COOKIE, token, {
  httpOnly: true, // Prevents XSS attacks
  secure: process.env.NODE_ENV === "production", // HTTPS only in production
  sameSite: "lax", // CSRF protection
  path: "/",
  expires: expiresAt ? new Date(expiresAt) : undefined,
});
2. Input Validation
All inputs are validated using Zod schemas before processing:
const signInSchema = z.object({
  email: z.email().min(1),
  password: z.string().min(1),
});
3. Error Handling
Proper error handling prevents information leakage:
if (userErrors.length || !token) {
  throw new APIError("UNAUTHORIZED", {
    message: userErrors[0]?.message || "Invalid email or password.",
  });
}
Benefits of This Approach
- Type Safety: Full TypeScript support throughout the authentication flow
- Security: HTTP-only cookies and secure token management
- Extensibility: Plugin-based architecture makes it easy to add features
- Developer Experience: Clean API with minimal boilerplate
- Integration: Seamless integration with Shopify's Customer API
- Session Management: Built-in session handling with React Context
Conclusion
Implementing authentication in a headless Shopify storefront using Better-Auth provides a secure, type-safe, and developer-friendly solution. The plugin-based architecture allows you to create custom authentication flows that integrate perfectly with Shopify's Customer API while maintaining security best practices.
The complete implementation includes:
- ✅ Custom Better-Auth plugin for Shopify
- ✅ Secure cookie-based session management
- ✅ Sign-in and sign-up functionality
- ✅ Client-side session provider
- ✅ Type-safe authentication flows
- ✅ Error handling and validation
You can find the complete implementation in the Headless Shopify repository.